Substance Painter
Adobe Substance Painter is frequently used for authoring PBR (Physically Based Rendering) texture maps, and works well for creating realistic looking textures. Provided on this page are some project settings and export presets for Substance Painter that can be used to easily export textures for use in a Poiyomi Material.
Project Settings
For the most part, you'll be using whichever default Substance Shader was assigned in your Project. Usually that would be pbr-metal-rough or asm-metal-rough, etc.
Most, if not all Shaders in Substance Painter, should work when previewing the Material. However, if you plan to use Opacity to control levels of transparency, choose a version that supports it. If you are painting areas for things such as Glass, you would want to use something like pbr-metal-rough-with-alpha-blending or similar.
To ensure you are using whichever one you prefer, click Window -> Views -> Shading settings from the Menu Bar in Substance Painter.
Export Presets
These templates were updated to include new workflows that were introduced between 8.0 and 9.0. However, the naming of the Texture files have been changed for simplicity.
To use these presets, download them and add them to your substance project either by navigating to File -> Import Resources and adding them, or dragging them onto the shelf (which will open the same interface with the presets pre-selected)
Alternatively, place these presets in your exports folder. For most people, this is located in one of the following locations:
- v7.2 and newer:
C:\Users\*UserName*\Documents\Adobe\Adobe Substance 3D Painter\assets\export-presets - Legacy Versions:
C:\Users\*UserName*\Documents\Substance 3D Painter\shelf\export-presets
Download
Usage
Textures
Textures have a specific prefix when exported: t_$textureSet_. t indicates it's a texture (and groups textures together when sorted), $textureSet which the name of the Material set set being used. At the end of the filename is the type of texture, which will be one of the following:
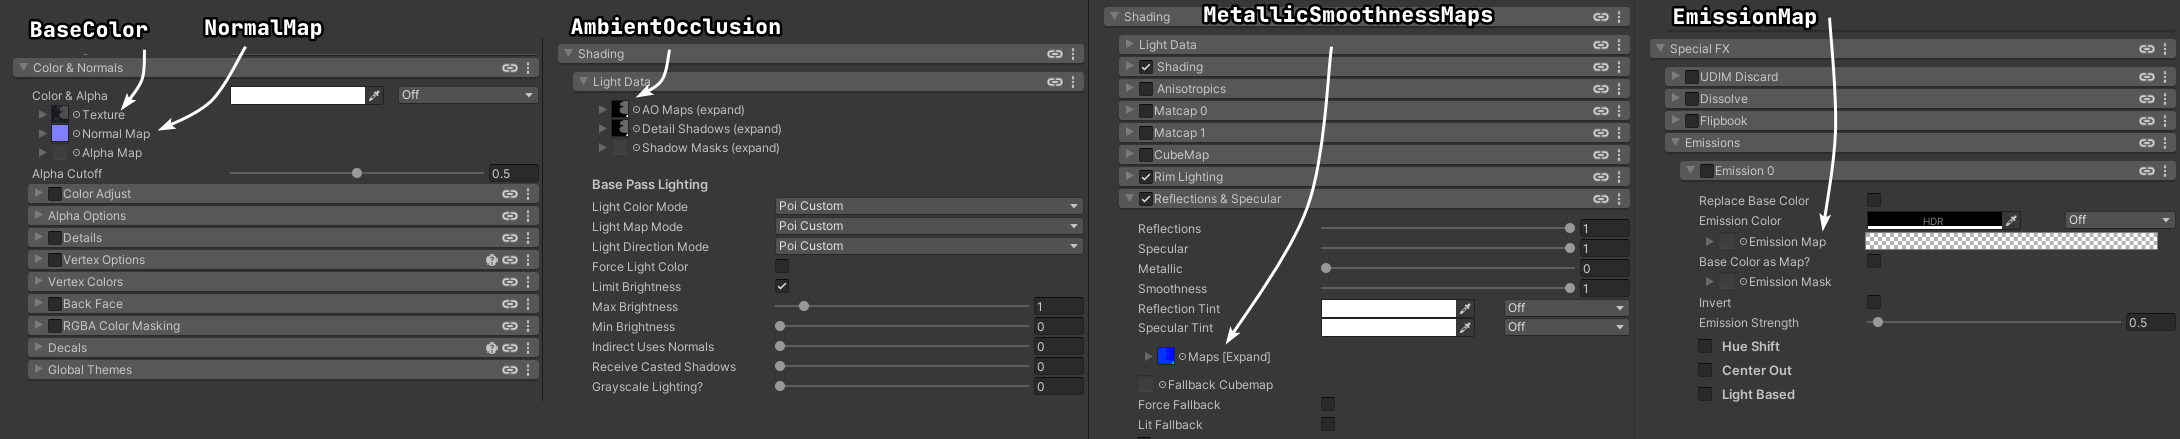
BaseColor: Place in theMain Textureslot in Color & Normals.NormalMap: Place in theNormal Maptexture slot in Color & Normals. Make sure to mark it as a normal map in the texture import settings.AmbientOcclusion: Place in theAOtexture slot in Light Data. Make sure to uncheck sRGB in the texture import settings.MetallicSmoothnessMaps: Place in thePacked Mapstexture slot in Reflections & Specular. Make sure to uncheck sRGB in the texture import settings, and that all of your sliders are set to 1.0, which uses the map's value. Note that this usesUser0andUser1channels in Substance Painter for the Reflection and Specular masks respectively, which can be hand-authored to control the amount of reflection and specular.EmissionMap: Place in theEmission Maptexture slot inEmission.GlobalMask: Place in one of the Global Mask texture slots inGlobal Mask. Make sure to uncheck sRGB in the texture import settings. Note that this uses the custom User channels in Substance for your Masks. This Template is programmed to useUser10for theRchannel,User11for theGchannel,User12for theBchannel, andUser13for theAchannel.
V9 Export Texture Locations (click to zoom)
Usage Notes
PBR textures look best when paired with realistic lighting. To take best advantage of this, good Shading settings are recommended. Some good starting points include:
- Realistic shading
- Multilayer Math shading, using only the first layer with a Border between
0.4and0.7and a Blur of0.4-0.6 - Wrapped shading with a wrap of around
1.0and a normalization of around0.5
Matcaps are not recommended, as they don't respond to the lighting environment the way metallics and specular do.
PBR shading relies on the world lighting being well-defined and correct. In worlds that are not lit correctly, base shading and metallic/specular effects may look wrong, or may be completely invisible.
ExtraMaps
When using the ExtraMaps preset, additional textures are exported:
- All textures from the v8 preset.
- The
v7MetallicGlossinesstexture for poiyomi v7 metallics and smoothness, which is also compatible with the Unity Standard Shader. AlphaMap: Separate alpha/opacity map for the base texture. Can be used to optimize the base texture, or for other effects based around the opacity of the material.- You should not use Alpha Map unless it's absolutely necessary. This is because the Alpha is already encoded into the Main Texture when using the
Opacitychannel in Substance Painter.
- You should not use Alpha Map unless it's absolutely necessary. This is because the Alpha is already encoded into the Main Texture when using the
Height: Height map. Currently best used as a height texture in Parallax Heightmapping. Can also be used directly as a vertex offset, though this usually does not have the same effect.
Legacy (v7)
A legacy export preset is provided for compatibility with Poiyomi v7. It is recommended that you upgrade to Poiyomi v8, as v7 is no longer actively supported or developed.
Poiyomi V7 Preset Download
Usage
BaseColor: Place in theMain Textureslot in Main.NormalMap: Place in theNormal Maptexture slot in Main. Make sure to mark it as a normal map in the texture import settings.AmbientOcclusion: Place in theAmbient Occlusiontexture slot in Light & Shadow. Make sure to uncheck sRGB in the texture import settings.v7MetallicGlossiness: Place in theMetallic Gloss Maptexture slot in Metallics & Specular. Make sure to uncheck sRGB in the texture import settings. This texture is also compatible with the Unity Standard Shader.EmissionMap: Place in theEmission Maptexture slot in Emission.